
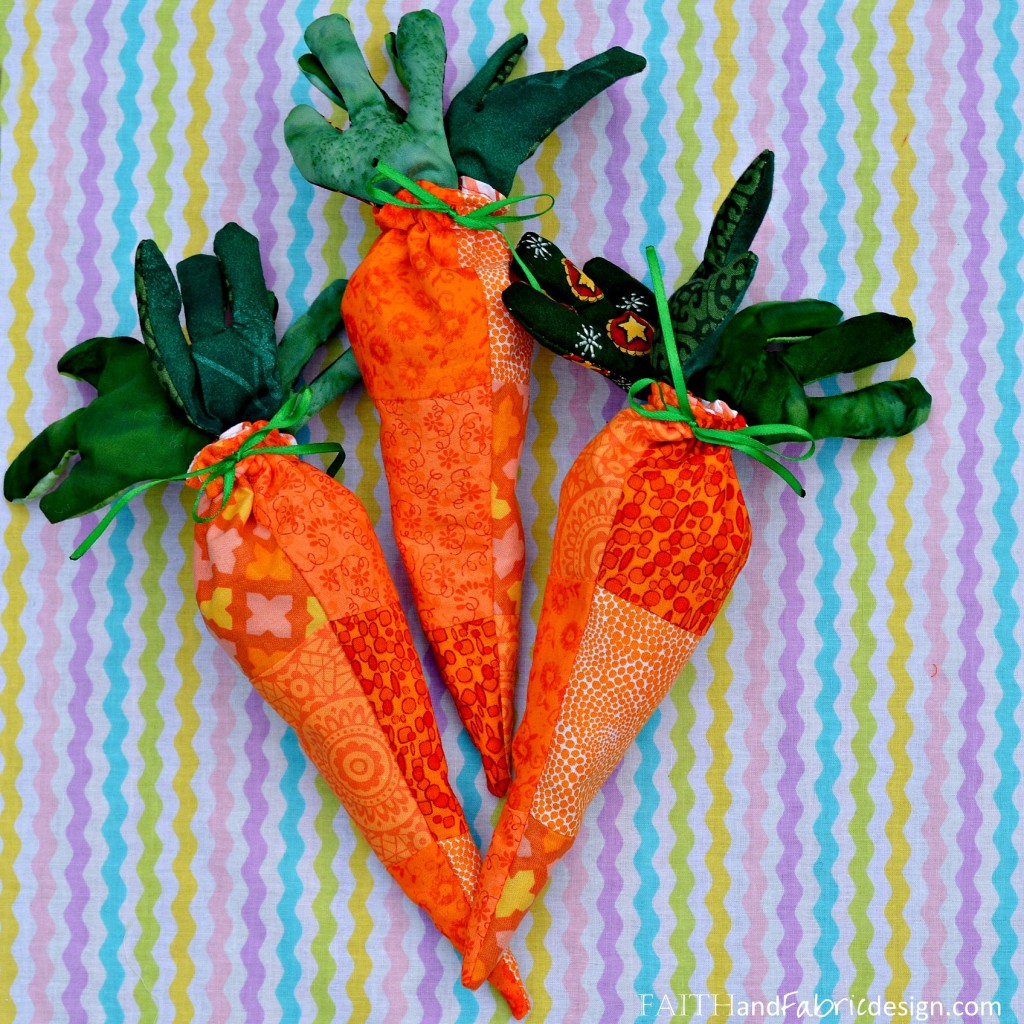
Here’s a fun and easy Easter sewing project that you can make with the fabric you have on hand – carrot bags! Make a few bags, fill them with your favorite Easter treats, and tuck them into the Easter basket of somebunny special.
WHAT YOU NEED
- fat quarters in orange (or scrap pieces)
- large triangle drawn and cut out on paper (or this great ruler!)
- orange thread
- green fabric scraps
- green thread
- green ribbon
- batting / polyfill
HOW TO MAKE
- To make the carrot interior and exterior:
- Draw a large triangle on an 8.5″ x 11″ paper that runs the entire length of the paper. Cut out for use as a template.

-
- Using the triangle template, trace the triangle on the wrong side of your orange fabric. (Or, as shown in the pictures, use scrap pieces to create a triangle with the same dimensions as the template.) Cut four triangles, as you will need four to make the bag (two outside, two inside)
- TIP: with a sharp blade on your rotary cutter, you can cut multiple layers of fabric at the same time
- Using the triangle template, trace the triangle on the wrong side of your orange fabric. (Or, as shown in the pictures, use scrap pieces to create a triangle with the same dimensions as the template.) Cut four triangles, as you will need four to make the bag (two outside, two inside)

-
- Place two triangles right sides together, and sew with a ¼” seam allowance to make the carrot exterior. Repeat with the other two triangles to make the carrot interior/lining.

-
- On one of the triangles (select a triangle that will be the front exterior of your carrot), sew a button hole that starts about 3/4” below the top. This will be where your ribbon feeds through.
- TIP: sew the button hole right near the seam to make the front of the carrot have a more patchwork feel!
- On one of the triangles (select a triangle that will be the front exterior of your carrot), sew a button hole that starts about 3/4” below the top. This will be where your ribbon feeds through.
- To make the leaves:
- Back to the paper. Draw a three-fingered leaf and cut out. Be sure to have at least a 1″ stem on the leaf so it can be sewn into the carrot.

-
- Trace the leaf on the wrong side of your green fabric. Cut out six leaves total (use a variety of scrap pieces).

-
- Sew the leaves right sides together with a 1/4-1/8″ seam allowance, and turn right-side out. Stuff a small amount of batting into each leaf – not too much, but just enough to help it slightly puff.
- To create the carrot:
- Trim the bottom of the two triangle bags so you’ll be able to make a sharper base once turned right-side out.
- Turn the carrot lining/bag right-side out. Don’t worry about making the sharp point at the bottom, as you’ll be turning it inside out again in a few moments.

-
- Place the lining inside the exterior bag, right sides together. Slip the leaves between the two layers so that the open/raw edge is aligned with the other raw edges. Sew ¼” from the top, leaving a 2” gap.
- Turn inside out, pulling the leaves through.

-
- Turn the raw edges (from the 2” gap) in and pin. Sew 1/8” from the top to both close the gap and secure the top of the bag.
- Sew a second line of stitches ½” below the first (or larger depending on how large your button hole is). Your button hole should be nested between these two lines.
- Thread a ribbon onto a safety pin and move through. Fill with your favorite Easter candy, tie, and enjoy!


Just for fun…this post links up at these great Catholic and quilt sites!
(Visited 494 times, 1 visits today)
(Visited 494 times, 1 visits today)
The post Tutorial: Easy Easter Sewing Projects – Carrot Bags appeared first on Faith and Fabric.


